Wednesday, 27 August 2014

A subtle pink and grey smokey eye

     
Face: 
Bourjois Healthy Mix foundation in No56 Light Bronze mixed with L'Oreal True Match foundation in Golden Beige. 
Dermacolor Camouflage mini concealer palette NR.3 in colours D10 and D5 to correct.
Origins Plantscription Concealer in Light.
L'Oreal Lumi Magique in Light.
Anastasia Beverley Hills contour powders in Banana, Fawn, Java and Sand. Banana to highlight under the eyes, Fawn to contour, Java to bronze and Sand to highlight the cheekbones.
MAC blush in Pink Swoon.

Eyes: 
Sleek brow kit in Light.
Avon eyelid primer in Light Beige.
Urban Decay Naked 3 Palette. Strange all over the lid and to highlight the brow bone, Dust used wet as a pigment all over the lid, Darkside in the crease and outer corners, and L'Oreal Glam Bronze Bronzer in Golden Bronze as transition shade.
Shu Uemura gold eyelash curlers. 
L'Oreal Volume Million Lash in Extra Black. 
Rimmel London Scandal Eyes eyeliner in Nude in the waterline. 

Lips:
L'Oreal Colour Riche lipstick in 235 Nude. 
Tanya Burr Cosmetics lipgloss in Chic. 

Thanks for reading!

Love H ♥

Wednesday, 6 August 2014

A few of my skincare essentials

Okay so I wanted to share with you some skin care products that I am really, really happy with. I've probably mentioned before that I have oily blemish-prone skin, which is an absolute nightmare (for me), when trying to find skin care products that actually work. I don't have particularly sensitive skin, however I don't like to use anything too harsh just incase it starts to break me out. After years and years of trial and error, at this particular moment in time, I am super happy with my skin care routine. So in this post I will be sharing with you a few of my favs! (These are not ALL of the products I use in my routine, just a selection). I would truly recommend any of these products to you if you have a similar skin type to me; and some of them would be ideal for those of you with dry or combination skin too, but I'll mention all of that when I get to the individual products. So let's get started!!! 


I have had this product for a long time now, and still haven't found anything I like more for moisturising my lips! It really can make the most chapped of lips look smooth and moisturised if used everyday. Honestly, if you suffer from dry or chapped lips it will quite literally change your life. This product has found a permanent place in my professional makeup kit; my clients absolutely love it! You can find this product in Boots if they have an Elizabeth Arden counter, or you can buy online from several different stores. I've linked Feel Unique up above.

This product is another tried and tested one of mine. I absolutely love using this on my clients because it's so good for every skin type. It moisturises dry skin really nicely, leaving it feeling smooth and looking hydrated, however it is non-greasy and so isn't too much for oily skin (I would know!) Another reason I love this product is because it's fragrance free and hypoallergenic meaning it's really great for sensitive skin too. It really is an all rounder. And sooooo cheap too! It's around £5.50 for 500 ML. AMAZING. LOVE. OK. MOVING ON. 

Now I think everyone and their mother has raved about Bioderma for YEARS now, but with really good reason. It is an amazing product for getting off makeup or just pre-cleansing the face before applying any makeup. It's sooo gentle on the skin and is fragrance free so good for sensitive skin types. I can't recommend this product enough, if you can get your hands on it, do it! It is quite hard to get hold of, I believe there are only a few small chemists and pharmacies that hold it in the U.K. I found mine in a chemist called Zest in Soho, London. But you can find it easier online. This is another product that I cannot live without in my makeup kit.

This product isn't really everyday "skincare" as such, it's kind of just a glorified water spray, but it is a really nice product. I love using this to refresh my face throughout the day or even on a hot day it's great to spray all over to cool you down. I tend to use this on clients before I start the makeup to refresh the skin and prepare it for the makeup. It is around the £10.00 mark so quite expensive for what it is, but if you're willing to pay that much then I would totally recommend it. 

Now this is a product that is really particular to your skin type, I would NOT recommend this at all if you have normal to dry skin. This really is a product for oily skin types. This product is sooo good at cleansing oily skin, it really gets rid of excess oils and impurities. However, even if you have super oily skin, I wouldn't recommend using this as your daily cleanser, just because it is so strong. I personally love the feeling it gives the skin once you've used it, it's just like the feeling you get when you wash your body with a bar of soap, like squeaky! But one of my close friends also has oily skin and she really doesn't like the feeling of this cleanser. So it really is a personal thing. I would suggest going to your nearest Kiehl's store if you can, and seeing what they have to say. They're really helpful in there!

This is a new found love of mine. This moisturising balm is so rich and creamy, it makes the skin feel so smooth. It has ingredients in it that help to boost natural collagen production and help to keep the skins moisture locked in. I use this before bed, as it is quite rich for me during the day as I have oily skin. But for those of you with dry skin this would be amazing for you during the day and at night. This is a really expensive product at around £60.00, and I haven't purchased it just yet, (the pot in the picture is just a tester). However, I am absolutely going to purchase it when I run out, no doubt about it, and I will  be buying a tub for my kit too!!! 

Okay. So this product is one of my absolute all time favourites. If out of this whole list of products you fancy buying one but don't know which, make it this one! This will not disappoint you. So this product is an intense clearing treatment in the form of a charcoal mud mask. It quite literally PULLS out the impurities in your skin, you can see it happening. There are similar things on the market, I believe Origins make a really good clay mud mask. But this one has been soo talked about and hyped up that I really think it's worth the investment. Yes, investment. It's not cheap. It retails at about £40.00 for a 34g tub. But oh my it's so worth it! If you click on the link above it will take you to the webpage, where you can read the list of things that this does for your skin. Amazing stuff.

Last but not least, these babies! I love No7 skin care products I think they are such good quality for the price. I use the eye cream in the morning and the overnight eye balm in the evening (obviously). I really love they P&P eye cream for making my under eyes appear more radiant and smoothing out those little fine lines, and the overnight balm for improving my dark circles and reducing puffiness.

And so that's it!
I really hope that you enjoyed reading this post and maybe learnt about some new products! 
If you want to see a more in depth review or demo about any of the products I've mentioned, then just be sure to leave a comment below and I will do that for you :-)
Also leave a comment telling me what your favourites are, I would love to know, I'm all about trying new products!

Thanks for reading guys, I'll speak to you in my next post.

Love H ♥

Monday, 28 July 2014

Bobbi Brown foundation sticks - Review

Highlighting and contouring has become so, so popular over the past few years, now everyone wants that gorgeous Kim K sculpted look. And why not?! I personally love the contoured look. There are so many different products out there that you can use to achieve this kind of look, but today I'm going to talk about my favourite. The Bobbi Brown Foundation Stick.  

Bobbi Brown Foundation Sticks - £29.00 each 
So, by the name of the product you can probably guess that this is a foundation in stick form. The foundation sticks have what I would describe as a cream to powder finish, which makes them feel super lightweight on the skin, but still give a really good coverage. This product is really great for all skin types; it will stay on all day as it has AMAZING lasting power, but won't dry out your skin at all. It's just the perfect in between. Now, this product can be used on it's own as a foundation, however I like to use this product over the top of foundation as a contour and highlight base (meaning I will apply powder contour and highlighting products over the top of them once the foundations have been set). It is completely up to you how you use this product, it is so versatile there really is no "proper" way to use it. So I'm going to be showing you how you can achieve a subtle contoured and highlighted effect using the BB Foundation Sticks.

The highlight colour that I use is called 1 Warm Ivory. This colour is a really good highlighting colour for me, but they have a wide range of colours on the website that you can choose from, this shade won't necessarily work for everyone!


The contour colour that I use is called 6.5 Warm Almond, which I think is a really good contour shade for a variety of skin tones. It's is quite a warm toned brown, which usually I would stay away from when contouring, but when used as a contour base product, it works really well and adds a little more of a bronzed look to the finished makeup, (which I love!)


So the first thing that I like to do is apply a base coat of foundation to even out my skin tone, for this look I used the Revlon Colourstay foundation in 330 Natural Tan. I also concealed a little underneath my eyes with the Origins Plantscription Anti-Aging concealer in 01 Light. (Amazing concealer, might have to do a review!)


Once I had applied those two products and blended everything out, I then applied my BB stick in Warm Ivory to the highest parts of my face. This includes: the cheekbones, the bridge of the nose, centre of the forehead, above the tail of the brow, cupids bow, lower cheeks and chin. The reason you apply the highlight colour to these areas is because these are the areas we want to appear more prominent. Applying the colour under the eye aswell as on the cheekbones will make your eyes appear brighter and is more flattering.

The next thing to do is apply the contour colour to the following parts of the face: the temples, in the hollows of the cheeks (under cheekbones), along the jaw line, down the sides of the nose, along the hair line and underneath the lower lip. Applying this colour to these areas will intensify the natural shadows of the face, resulting in it appearing more structured and chiseled. 

You can apply less or more of each product depending on how intense you want the look to be; I kept mine pretty subtle. 


Once you have all of the contour and highlight colour placed in the areas you want, you can start to blend them out. I like to use a small stippling brush to do this as I think it works really well in ensuring that the product is blended seamlessly. The brush that I use is the Zoeva Petite Stippling 122 brush, but really you can use any brush that you feel comfortable with. A blending sponge would work just as well, or you could even use your fingers if you prefer!


I like to blend all of my highlight colour first and then move on the the contour colour, because then you are making sure that you get no dark colour in the areas that you want to keep nice and bright. 
Once everything is blended, you can go on to complete the rest of your makeup. For this look I just went for a simple winged liner and nude lip. 


So, the point of this post was really to talk about the BB foundation sticks and how I like to use them, so I kept the look pretty subtle. However, contouring and highlighting can completely transform your face and can be done a lot heavier than how I've shown it here (E.G Kim K). If you want to see a full on contour and highlight routine then just let me know in the comments!! 

I hope you found this post helpful and maybe learnt something new! If you have any questions be sure to leave them in the comments, I am more than happy to answer them for you!


Speak to you soon :-)


Love H ♥

Thursday, 24 July 2014

My favourite nude lip products of the moment

As much as I love to experiment with colour, nudes will always be my favourite lip colours. I don't usually go for pinky toned nudes for myself, I'm much more of a peachy brown toned nude girl. So here's a look into my favourite 6 nude lip products of the moment. I hope you enjoy!!!!


My first favourite is actually the most rescent addition to my collection. It's the L'oreal natural blondes lipstick in 235 Nude. 


It's a much darker nude than I would usually go for, but I'm really liking the sophisticated look of this product at the moment. This product has a super intense fragrance so if you don't like fragranced lipsticks then this isn't for you, but it's not a horrible smell. 


In terms of colour payoff and pigmentation I would give this product an 8/10. It's really pigmented and creamy but it's not like WOAH THAT'S PIGMENTED. You know? Haha. I really love the formula of this product and am excited to try out more from the line. 

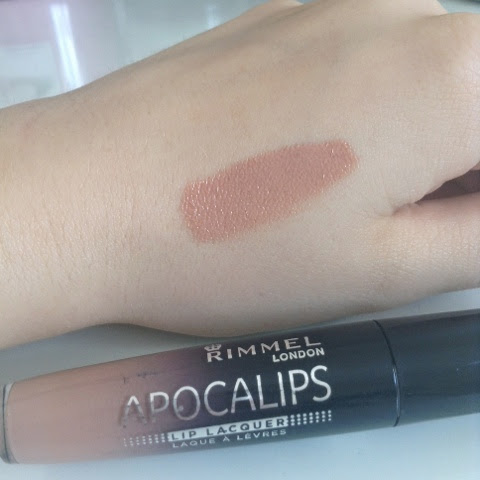
My second favourite is probably my favourite of them all and is the one I reach for the most! I think everybody and their dog has raved about this product, and ima rave some more. This is the Rimmel London Apocalips Lip Lacquer in Nude Eclipse. 


I love this product with all my heart. The colour is my absolute perfect nude shade for starters! 


And secondly I love the matte formula of this product. It looks so good on the lips and stays put for soooo long. It doesn't have the best smell in the world but I can get over that. It's just the best product to throw on effortlessly and still look great. I highly recommend this product and all the other colours from the Apocalips line. 

My next favourite is the Revlon Colourburst lipgloss in Bellini. 


I really like this peachy toned gloss, it gives a really nice natural sheen to the lips and had pretty good colour payoff. I find myself reaching for this gloss a lot on hot days when I just want to look effortless and glowy. 

My next nude is MAC's Creme D'Nude lipstick. 


I really, really love the colour of this product, and the smell and the formula and the pigmentation and well, everything. Hoooowever, it has a really thick and creamy consistency so you have to be really careful that you don't apply too much, or it can look really awful! I tend to just pat the product onto my lips with my finger to ensure I don't over do it. Other than that, I love this lipstick!!! 

My next favourite is YSL's Sheer Candy lipstick in Coco Givrée. 


I have already done a review on this product so if you want hear what I think about this lipstick (I LOVE IT), then go check out that blog post. 

My final favourite nude lip product is the NYX Mega Shine Lipgloss in Sugar pie. 


I cannot say enough good things about this product. I love everything about it and the smell is AMAZING. It smells so good guys I can't even tell you. 


This product is another one that's just so effortless. It doesn't have the most amazing staying power but I don't mind applying it again as I love the taste haha. Weirdo. Anyway, I really recommend this product, it's my favourite colour from the mega shine line, I haven't loved any other one as much as I love this one and I've bought a few!! 10/10 in my opinion! 

I hope you guys have enjoyed reading this post and I have maybe given you an excuse to go out and grab a new nude lip product ;) 

Thanks so much for reading, 

Love H ♥

Wednesday, 23 July 2014

Soft purple smokey eye - Day to night transformation

So I thought I'd quickly share with you this purple smokey look that I did on myself today, because I want to show you how you can completely transform your look to change it from a day look to a sultry night look, with one simple step... Changing up the lip colour. 


The first lip colour I paired with this look was a nude. You can see from the top two pictures that the eyes look soft and summery and perfect for day time when paired with a nude. The bottom two pictures show the eyes paired with a deep purple lip colour, which as you can see, instantly vamps up the look and completely changes it into a sultry night time look. 

My change in lip colour for this look was quite dramatic because I wanted to show you clearly how different it can make the look appear, however this would work with just a subtle change, for example swapping a light day time orangey red for a deep, burgundy red for night time. 

This has got to be the oldest trick in the book for a simple way to change up your makeup quickly, however I just wanted to share with you how good this tip is and show you visually what a difference just changing the lip colour can make. 

I hope that this has been helpful and maybe you learnt something new. 

Love H ♥


Tuesday, 3 June 2014

YSL Volupte Sheer Candy in Coco Givree

Just a quick little review. I picked this product up rescently, I hadn't tried anything from the sheer candy line before and so far I am loving it!!! The formula is so, so moisturising and gives the lips a beautiful shine, making them look healthy and plump. Obviously it comes with a hefty pricetag (£25), as does everything by Yves Saint Laurent, however I think if you want to invest in a lipstick that is wearable and easy to apply for every day use, then a lipstick from this line is perfect. Plus can we just talk about this packaging...


Yeah.

The colour payoff of these lipsticks is super sheer (which I quite like), though the lasting power isn't really that great at all, at least on my lips... Though I do lick my lips a lot. However, with a liner underneath I feel that they last pretty much the same as the average gloss. 

The colour that I bought is called Coco Givrée, which is a browny nude colour - the type of nude I typically lean towards. 


I bought this colour because I knew I would get a lot of use out of it and I was right, I've been wearing it pretty much every day. I'm a strong believer in if you are investing in a product then make it something you will use often, rather than just on the odd occasion. I understand that some products are special and you don't want to use them all the time, but I just like to get my moneys worth, you know? 
Anyway, I love this nude colour and it's fast becoming my new fav! Will I invest again? Most definitely.

Thanks for reading! 

Love H ♥

My top red lip products of the moment

I am the girl who will wear a red lip just to go grocery shopping. I love experimenting with lip colours but there is something so classic and elegant about a bold red lip, and I love it. 

Despite 'red' being a pretty basic colour, there are so many different shades and finishes that make each red lip colour a little unique. Here are my 4 favourite red lip colours of the moment... 


This red is a really gorgeous, orangey-red colour. The lipstick itself was around the £3 mark which is an absolute bargain considering it's amazing colour payoff and super moisturising formula. The product isn't very long lasting on it's own but when paired with a liner, it's a serious contender to most drug store products. For the price it just has to be a favourite. I believe you can get this product from any Select clothing stores here in the U.K, or online at http://www.beautyukcosmetics.com.

The beloved Ruby Woo. Well, of course this is a favourite of mine, isn't it just a favourite of everyone's? This lipstick is the most perfect shade of red because it suits every single skin tone. The undertones aren't too blue, but they also aren't too orange or pink, making this the perfect neutral red tone for everyone. Not only is the shade stunning but the matte formula and finish of this lipstick make it so unbelievably long lasting it's insane. You can eat, drink, and party all night and this lipstick will not budge. The only thing I would recommend is to exfoliate and moisturise your lips MAJOR TIME before applying this product as it is really drying and will cling to any chapped bits and look super unattractive on the lips (trust me, I've been there). Also using a lip liner with this product will increase the staying power even more. 

I am obsessed with the Mega Shine lip glosses from NYX and this product is no disappointment. The colour of this lip gloss is so pretty, I'm really someone who loves a dark lip and so this colour is totally my thing. You can see from the picture just how moisturising the product is, which I just loveeeeee, however the lasting power isn't the best. These glosses smell amazing, they look amazing and the price is pretty amazing too, so that's why it's definitely one of my favourites. I couldn't find this particular lipgloss on the NYX website for some reason but I liked the website anyway. You might be able to find it elsewhere on the internet. Sorryyyy :(

And last but by no means least...

I think everyone and their mother has raved about the Rimmel Apocalips Lacquer's, and with good reason! The colour payoff of these babies is ridiculous! I am in love with the formula of these lacquers, they're really thick and pigmented, but they don't feel heavy on the lips and they are actually reasonably moisturising. They do last for quite a while on the lips but are by no means as long lasting as MAC Ruby Woo or something like that. They don't smell the best, but I'm willing to over look that because the product itself is so good. For the price that they are, which is around £6, you really can't go wrong.

Hope you found this helpful, thanks so much for reading!

Love H ♥